Showing posts with label Spitfire. Show all posts

08 February 2011

How the USS Wasp Helped Defeat Rommel's Afrika Corps

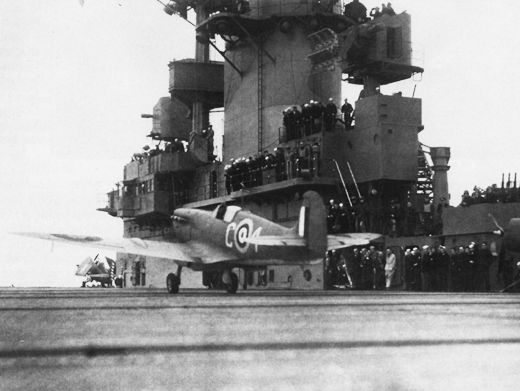
Spitfire Mk.V makes its takeoff run on the USS Wasp
From 1940 to 1942 the Italian Regia Aeronautica and the Luftwaffe mounted over 3,000 sorties against the British fortress island of Malta in the Mediterranean in an effort to secure their supply lines to Field Marshall Erwin Rommel's Afrika Korps in North Africa. Despite repeated attacks, the Allies managed to keep Malta supplied, even with Axis airfields only sixty miles to the north in Sicily. With the coming of the harsh Russian winter in 1941, poor flying conditions put a temporary hold on most air operations over the Eastern Front and Hitler decided once and for all to deal with Malta. Aircraft idled on the Eastern Front were temporarily moved to airfields in Sicily and southern Italy to begin an intensive aerial bombardment as a prelude to an invasion of the outpost. By the end of January 1942, Malta's defenses had been reduced only a few dozen Hawker Hurricanes which were far outclassed by the Messerschmitt Bf 109s that routinely prowled the skies around the British garrisons. The Hurricanes were delivered to Malta by a Royal Navy aircraft carrier- launching from a point 600 miles west of Malta off the coast of Algeria for the long flight to Malta. Now the British planned to send Supermarine Spitfires the same way to bolster the defenses of the island. Supermarine's engineers devised a 90 gallon external belly tank to extend the range of the Spitfire as well as the addition of a dust filter under the nose to keep the carburetor air relatively grit-free.

On 7 March 1942 the HMS Eagle delivered fifteen Spitfire Mk.Vs to the island and by the end of the month, the Eagle made two more deliveries. But the Luftwaffe and the Regia Aeronautica stepped up the pace of their attacks on the beleaguered island fortress and the bombers and torpedo bombers that were based on the island to harass Axis shipping had to be withdrawn, providing a much needed respite for the Afrika Korps who could now be supplied unmolested. The small Spitfire force suffered heavy attrition both in combat and due to air attacks on the island airfields and by the end of the month, the only carrier available to deliver Spitfires to the island, the HMS Eagle, had developed steering problems that would lay her up for four weeks in the dockyard at Gibraltar. As a result, on 1 April 2942 Prime Minster Winston Churchill contacted President Franklin D. Roosevelt for assistance in getting more Spitfires to Malta. No Spitfires were available in Egypt to be spared, and the other two available Royal Navy carriers weren't suitable- the HMS Argus was too small and the HMS Victorious' lifts were too small for Spitfires. The Luftwaffe hoped to knock Malta out before the late spring thaw in on the Eastern Front. 
Spitfires being craned aboard the USS Wasp

On 10 April 1942 President Roosevelt ordered Operation Calendar- on that day the USS Wasp docked in Glasgow and loaded forty-seven Spitfires while retaining twelve Grumman F4F Wildcats for self-defense. Nine days later the Wasp and her escorting force of British warships entered the Mediterranean. On 20 April 1942 at sunrise off the coast of Algeria, the Wasp launched her Wildcat combat air patrol first followed by the twelve Spitfires on the deck and then the thirty-five Spitfires that were brought up from the hangar deck. Alll but one of the Spitfires made it to Malta, greatly bolstering the defenses. Unfortunately the following day the Luftwaffe struck back at the island's airfields and by the end of the day, only seventeen Spitfires were left operational. RAF repair crews labored under constant air attack to cannibalize battle damaged Spitfires that were beyond repair to get the others operational to fight off the next attack. Once again, Churchill contacted Roosevelt and on 29 April the USS Wasp arrived back in Glasgow for Operation Bowery. This time not only did the Wasp take aboard forty-seven Spitfires, but she was joined by the newly-repaired HMS Eagle which took seventeen Spitfires. At dawn on 9 May 1942 a force of sixty-four Spitfires departed; one crashed on takeoff, killing its pilot and a second Spitfire flown by Royal Canadian Air Force pilot Jerry Smith found once airborne that he couldn't draw fuel from the 90-gallon drop tank. Once the deck of the Wasp was clear, he managed to land safely back aboard the carrier despite never having landed on a carrier and his Spitfire not having an arresting hook! No barriers were engaged either, and as result, the US Navy pilots aboard the Wasp "unofficially" awarded him a set of gold Navy pilot's wings. 

Spitfires share the deck with Wildcats with the HMS Eagle following
Of the sixty-two Spitfires that set out for Malta that day, two were lost along the way. As each Spitfire landed, it was immediately refueled and rearmed while a Malta-based pilot replaced the ferry pilot, all while the engine remained running. RAF ground crews had each Spitfire airborne and ready to meet the next Luftwaffe attack in only 15 minutes! Over the next two days, the Spitfires and remaining Hurricanes on Malta exacted a harsh price from the Luftwaffe attackers, but by this point, the weather was improving over the Eastern Front and Hitler ordered the aircraft transferred to the Mediterranean for the Malta operation moved back to Russia. The Regia Aeronautica was given responsibility for knocking out Malta's defenses but never came close to achieving the near-defeat of the fighter defenses of April and May of that year. Between 18 May and 8 June another seventy-six Spitfires were delivered to Malta, this time by Royal Navy carriers, but it never matched the effect of the USS Wasp making just two deliveries, leading Churchill to quip "Who says a wasp can't sting twice?"

The overall effect of having Malta as a base of operations against Axis shipping in the Mediterranean cannot be understated- of the Axis merchant ships that provided the lifeline to Erwin Rommel's Afrika Korps, 70% of Italian merchant shipping was sunk by Malta-based aircraft and 23% of German merchant shipping was sent to the bottom of the Mediterranean by the RAF on Malta. Had the British lost Malta, the outcome of the war in North Africa might have been very different.

Source: Military Aircraft Monthly International, Volume 10, Issue 1. "Air Wars: Spitfires to Malta" by Dr. Alfred Price, p4-11.

10 January 2011

British Defenses Against the Summer 1944 V-1 Bombardment

Cutaway view of the Fiesler Fi 103, or V-1 "Buzz Bomb"
Within a week of the Allied landings on Normandy on 6 June 1944, the Germans initiated a new form of bombardment against London, launching ten of Hitler's "Revenge Weapon No.1" or Vergeltungswaffe 1- V-1 for short. Of the V-1s launched in the early morning darkness of 13 June, six suffered failures that prevented them from even reaching the English coast from launch sites at Pas de Calais. Four bombs made it into British airspace, three of them hit in open land causing no casualties. One of those four V-1s, though, hit Bethnal Green, 2 miles from the famous Tower Bridge (which was used as the nominal aiming point) where it killed six people and injured nine more. British intelligence had predicted history's first cruise missile bombardment for a year, but the opening salvoes were far smaller than what was feared. It took three days to resume the launches and by 16 June 244 V-1s had been fired at the British capital. Of those missiles, 153 crossed into British airspace and of those V-1s, 73 hit the London area causing widespread damage and civilian casualties. 

German launcher crew prepare a V-1 on its firing ramp in France
In the three day lull following the first attack, the Royal Air Force and British Army swiftly deployed its defenses to southeast England. The first line of defense consisted of nine squadrons of Supermarine Spitfire and Hawker Tempest fighters as well as two squadrons of De Havilland Mosquito night fighters. The aircraft three lines of standing patrols, the first line 20 miles off the coast, the second line at the coast, and the third line 15 miles inland. Behind the fighter patrols came the gun zone made up of 192 heavy caliber AA guns and nearly 200 light-caliber guns in an area 20 miles deep. If a fighter pursued a V-1 into the gun zone, gunners were ordered to hold their fire to allow the fighter to complete its pursuit. Behind the gun zone on the southeast suburbs of London was the balloon zone made up of 480 barrage balloons. Over a quarter million mothers and children were evacuated out of London itself during the bombardment. Up to the end of June 1944, an average of 153 V-1s were fired at London. One-third failed or were shot down before crossing the English coast. Another one-third crashed or were shot down over southeastern England before reaching London. But that left a significant amount that managed to hit the London area. 


By mid-July, the defenses were revised based on the experience so far. This time each defensive measure was given a predefined zone for unrestricted engagement of any flying targets. The British Army's AA gun batteries were increased to 412 heavy guns and nearly 600 light guns in a 65-mile long strip along the coast that allowed the gun-laying radars of the batteries a clear view over the English Channel. Fighter pilots were prohibited from crossing the new gun zone, knowing that the gun batteries had unrestricted rules of engagement. The fighter zones were now split into two, with an outer zone over the English Channel that stopped five miles from the coast where the gun zone began. The inner zone began at the rear of the gun zone along the coast and extended back to the barrage balloon zone in London. In less than a month the number of barrage balloons increased to over 2,000. With the new defensive layout, over one-half of incoming V-1s were stopped from reaching the capital. 2 August would be the heaviest bombardment day, with 316 V-1s launched from 38 launchers in Pas de Calais. Of that number, 107 would impact in London. On that day, the nominal aiming point for the V-1 batteries in France, the Tower Bridge, took a direct hit from a V-1. 

A Spitfire pursues a V-1 at treetop height
By early August, the first Gloster Meteor jet fighter units were becoming operational and were tasked with V-1 interception. However, there were three developments that would vastly improve the British defenses, all technological wizardry courtesy of the United States. First was the SCR-584 gun laying radar that was the state of the art in 1940s radar technology and could lock onto targets instead of having to be manually directed by operators. A new device called the the Number 10 Predictor was the second device, it could exploit the improved fidelity from the SCR-584 to direct the AA fire more accurately. And the third bit of wizardry would also save many US Navy carriers and warships in the Pacific- proximity-fuzed AA shells that no longer needed a direct hit to bring down a target. With these three advances, the average V-1 engagement by a British Army gun battery only used a mere 156 rounds to bring down a V-1. 

The last V-1 launched from Pas de Calais came on 1 September, by which point the launch sites were all overrun by British Army units on the breakout from the Normandy beaches. From that point on, the V-1s that hit London were delivered by air-launching which was less effective and more prone to interception. During the first phase of the bombardment from June to September 1944, until the British defenses received new radars and proximity-fuzed AA shells, the most effective defense was actually the Allied air attacks on the French rail system. V-1 launch sites often had to wait days before receiving new missiles to fire due to attacks on supply trains and the rail network itself. Throughout this first V-1 bombardment phase, the launchers at Pas de Calais never launched V-1s at their intended capacity. 

The V-1's magnetic compass in the nose was enclosed in a wooden sphere
By far the most interesting defense that nearly got fielded in the summer of 1944 also came from the United States. Dr. Don Hare and his team at the Airborne Instruments Laboratory in New York were working on radio countermeasures systems when they were asked by the US government to assist in developing a counter to the V-1 attacks on London. Since the V-1 required no outside cues, it was invulnerable to jamming. Its direction guidance came via a magnetic compass in the nose that cued the master gyroscope that controlled the rudder. As the V-1 had to be simple to produce, it lacked any ailerons and its straight wing lacked any dihedral to provide stability. RAF pilots had already discovered a V-1 could be thrown off course and downed by forcing the bomb into a steep bank by tipping one wing. Dr. Hare's team reasoned that if a suitably strong magnetic field could be created, the magnetic compass could be tricked into cueing the master gyroscope to put the V-1 into a tight turn, thereby downing it. The American team's idea was to use existing railway lines that formed a loop around London 60 miles in circumference as a giant magnetic loop. By connecting specific rail lines in a giant circuit, it would take 1,000 amps of DC power to create a magnetic field over London that could confuse the V-1's autopilot. It was determined that 20 to 30 megawatts were needed which was within the capacity of a large commercial power station. Design work began on the needed equipment, but the "Mightiest Magnet" program ended when the launch sites in Pas de Calais were overrun by Allied forces. 

Source: International Air Power Review, Volume 27, Winter 2010/11. "Pioneers & Prototypes- Vergeltungswaffe 1- Adolf Hitler's revenge weapon" by Dr. Alfred Price and P.G. Cooksley, p150-159.

02 January 2011

The Spitfire Floatplane That Reginald Mitchell Would Have Loved

During the 1940 Norwegian campaign, the RAF found itself at a disadvantage with relatively few airfields to operate from during the German invasion of Norway and Denmark, Operation Weserübung. In fact, on the day of the invasion, 9 April, German paratrooper units seized three main airfields in the southern part of the country near the capital, Oslo. The British Air Staff issued a priority requirement for floatplane versions of both the Supermarine Spitfire and Hawker Hurricane that could operate out of the many fjords of the Norwegian coast. Folland Aircraft began work on a Spitfire Mk.I using floats from a Blackburn Roc, but within 24 hours of the invasion, major cities as far north as Narvik had already been seized by German forces. As result, the requirement faded away and the aircraft was demodified and returned to normal configuration. However, the idea of a Spitfire floatplane resurfaced in 1942 following some low-priority work on the concept at Folland that had continued even after the fall of Norway. This time a Spitfire Mk.V was used and this time, specially designed floats were used that were the brainchild of Arthur Shirvall, who had designed the high speed floats that were used in the 1920s and 1930s on the Supermarine family of racing floatplanes that the Spitfire claimed its ancestry. Additional modifications to the Mk.V Spitfire included a four-bladed propeller to replace the stock three-bladed unit and an extended ventral fin below the tail to counteract the reduced directional stability caused by the twin floats.

On 12 October 1942 the Spitfire floatplane made its maiden flight from Southampton harbor and initial test flights showed the need for a larger ventral fin. After more modifications, the Spitfire floatplane prototype flew again in January 1943 from Glasgow, Scotland, on its first RAF service trials. Fully loaded, the Spitfire floatplane only weighed 1,100 lbs more and only suffered a 40mph reduction in maximum speed, being capable of 324 mph at 19,200 feet. With a rate of climb of 400 feet/minute, it was less than a stock Mk.V Spitfire, but acceptable to the RAF. Surprisingly, there was only a modest reduction in maneuverability and test pilots found the Spitfire floatplane more maneuverable than any other floatplane. Handing both in the air and on the water was found to relatively easy during the service trials. Other than having to compensate for the torque of the engine on the takeoff run by applying 1/3 to 1/2 rudder, the RAF test pilots felt that the Spitfire floatplane could be easily flown by line pilots.

In the summer of 1943, the RAF began planning for an operation that would utilize the Spitfire floatplane against the German garrisons on the Dodecanese Islands in the eastern Mediterranean off the coast of Turkey. Transport aircraft supplied the various garrisons and the plan was to use Spitfire floatplanes hiding at a small, uninhabited island in the area to attack the transport aircraft. A submarine would be used as a base and house the crews and between missions the Spitfire floatplanes would rest at their moorings next to the submarine under camouflage netting. Folland Aircraft was issued a contract to convert two more Spitfire Mk.Vs to floatplane configuration and after the flight testing of the two newer aircraft, all three three were partially disassembled and shipped to the RAF seaplane base at Fanara, Egypt, on the shores of the Great Bitter Lake. The prototype was found to have serious corrosion in the empannage and was set aside until Folland could ship a new tail to the base. The other two Spitfire floatplanes were assembled and test flown with the work finishing up in November 1943. Operational pilots were recruited from Spitfire crews assigned to the Middle East and they received brief seaplane conversion training on a Supermarine Walrus before converting to the Spitfire floatplanes. Four pilots underwent conversion training for the Dodecanese operation. 

During training on the Egyptian lake, the pilots found that the floats leaked more than hoped and the aircraft had to be hauled out of the water to allow the floats to drain. Not an issue at a seaplane base, but at a submarine mooring on a small island in the Dodecanese Islands, it would be an issue. Pilots also found that the Spitfire floatplane only handling vice was trying to take off in crosswinds over 15 mph which was near impossible. Questions arose as to whether a suitable "secret" location could be found in the Dodecanese chain that would allow more flexible takeoffs. Discussions on the matter eventually proved to be moot as the Luftwaffe reinforced the area just a few weeks prior to the planned start of the operation. The four pilots were released back to their original Spitfire units and the three Spitfire Mk.V floatplanes were put in storage. 

It wasn't quite the end of the story yet as during the spring of 1944 the idea of the Spitfire floatplane was re-examined for operations in the Pacific. Once again, the RAF asked Folland to convert a Spitfire and this time a powerful Mk.IX was chosen, making its first flight on 18 June 1944. With a more powerful engine, this version of the Spitfire floatplane could even outperform a standard land-based Hawker Hurricane. However, the pace of the war intervened again as the operational need faded and the Spitfire Mk.IX floatplane joined the other three Mk.V float planes in storage. Eventually all were scrapped, ending the story of a unique Spitfire variant that hearkened back to its roots as one of Reginald Mitchell's inspired Schneider Cup racing floatplanes. 

Source: Model Aircraft Monthly International, Volume 9, Issue 12. "Airwars 16: Spitfires on Floats" by Dr. Alfred Price, p4-9.

10 December 2009

One of the more unusual but little known Supermarine Spitfire variants was the Mk.IIC (later redesignated ASR.II) of which there were fifty used in the Second World War. The ASR.II were specialist air-sea rescue Spitfires converted from retired Spitfire Mk.IIs when production switched over the more powerful and capable Mk.V. The conversions took place from 1942 to 1943 and involved removal of the armament and chutes were added in the lower fuselage aft of the cockpit that could drop rescue packs that consisted of a dinghy and rations, smoke bombs to mark the location of downed pilots and flares. Additional packs could be carried on underwing racks as well.

In addition to these provisions, the Rolls-Royce Merlin XII that was standard for the Mk.II variant was swapped out with a more powerful 1,460-horsepower Merlin XX that had a 2-speed/1-stage supercharger (the Merlin XII developed 1,175-horsepower and had a 1-speed/1-stage supercharger).

The Spitfire ASR.II served with five search and rescue squadrons that operated over the Thames Estuary and the English Channel during the war.

Source: Spitfire by Stewart Wilson, Sovereign Series #1. Aerospace Publications, 1999, p28.